What are Roof Purlin Cleats?
Roof purlin cleats are used to support the roofs of residential or industrial structures. It is a long-lasting, quick, easily installable adaptable link. These are pre-drilled to fit standard purlin holes and are available in bolt-on or weld-on forms. If you want roof purlin cleats, you must use the product code that corresponds to the cleats you want as per CAD drawings related to your project. If only one side needs to be bolted, you will only need one cleat. For some projects, it is better to weld the cleats on the roof truss instead of bolting them.

Source: Raj Roofing Co.
By default, all cleats on roof truss are made of steel that hasn’t been painted. If needed, the finish can be powder coated or galvanized. Hot-rolled angle pieces are commonly used to make roof purlin cleats, which can be single or double.
Many practical advantages can be found in using single cleats, including the fact that they require just half of the material and are reasonably straightforward to install and handy when erecting beams close together when space is at a premium. The longest standard cleat is around 450mm long. If cleats are needed that are longer than this, they must be made by the fabricator.
Purlin cleats are typically manufactured from hot-rolled mild steel angle. The finish you choose depends on the environment the structure will be exposed to:
- Uncoated steel: Standard (uncoated): Suitable for internal environments or where the steel will be painted as part of the overall structure. This is the most economical option and is the default supplied by most manufacturers.
- Primer painted: Primer painted: A coat of red oxide or epoxy primer is applied before despatch. Suitable for general external use where a top coat will be applied on site.
- Hot-dip galvanized: Hot-dip galvanized: The cleat is immersed in molten zinc, providing excellent corrosion protection of 85+ microns. Ideal for agricultural buildings, coastal locations, or any structure exposed to moisture and humidity. Note that galvanizing can affect bolt hole tolerances, so holes may need to be drilled out after galvanizing.
- Powder coated: Powder coated: An electrostatically applied coating cured under heat. Provides a tough, decorative finish in any RAL colour. More common for visible architectural steelwork than structural purlin connections.
Purpose of Roof Purlin Cleats
Some of the purposes of Roof Purlin Cleats are:
- Its main function is to prevent the purlins from tilting.
- For roof slopes over 30°, stiffened purlin cleats are used.
- Moreover, stiffened cleats are used on tiles roof construction.
- It is especially good for applications that need to be hidden.
- For the four bolt connection to the section, M12 Grade 8.8 bolts are used, and for the bolt-on cleats, two M16 Grade 8.8 bolts hold the baseplate to the steel structure.
- There is an extra 18mm hole for attaching a safety harness connection.
Types of Roof Purlin Cleats
Some of the types of roof purlin cleats are:
- Double Bolt On Cleats: The double bolt-on cleat can be put in the middle of a rafter or to the left or right of the center for extensions. It is great for adding on to existing buildings because it doesn’t require welding at a high level. If you want to use it as an offset cleat, you need a wood support plate. For a wood connection, you need a 14mm hole, and for a steel connection, you need an 18mm hole. It gets rid of welding.

Source: Rhino Steel Cladding
- Welded Cleats: Welded cleats can be added for connecting roof timbers to steel rafters. They can be built in any shape or design you can imagine. They need to be welded to the mainframe before installing the structure.

Source: Builder Bill
Single vs Double Purlin Cleats
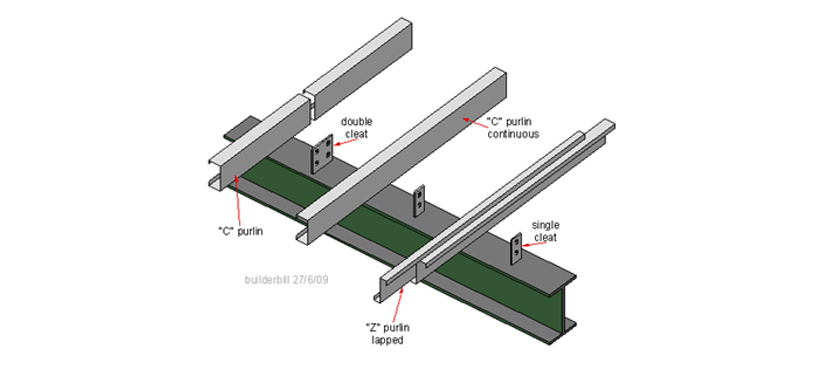
Image: rajasthanroofing
Choosing between a single or double cleat depends on how your purlins are joined and the load they need to carry. Here is a quick breakdown:
| Single Cleat | Double Cleat | |
| When to use | Lapped (overlapping) purlin joints | Butt-jointed purlins or high-load situations |
| Material | Uses half the steel — more economical | More steel but provides greater restraint |
| Space | Ideal where rafters are closely spaced | Requires clearance on both sides of the purlin |
| Install | Faster and simpler to install | Slightly more complex but very secure |
For most standard residential and light industrial roofs, a single cleat is sufficient. Double cleats are typically specified by the structural engineer for steeper pitches, heavier purlin loads, or where the purlins are butt-jointed rather than lapped.
Stiffened vs Standard Purlin Cleats
A standard purlin cleat is a flat angle section, but for steeper roof pitches the cleat must resist higher lateral forces as gravity tries to pull the purlin sideways down the slope. This is where stiffened cleats come in.
A stiffened purlin cleat has an additional gusset plate or stiffener welded to the back, giving it far more resistance to bending and rotation. The key rules of thumb are:
- Roof slopes up to 30°: standard (unstiffened) purlin cleats are acceptable.
- Roof slopes over 30°: stiffened purlin cleats are required.
- Tiled roofs: always use stiffened cleats regardless of pitch, as tile loads create more lateral force on the purlin.
If you are unsure which type your project requires, always refer to the structural engineer’s drawings or the purlin manufacturer’s load tables.
Purlin Cleat Sizes and Bolt Specifications
Purlin cleats are manufactured to match standard C and Z purlin depths. Choosing the correct size is important — a cleat that is too short will not adequately restrain the purlin from rotating. Common standard sizes include:
| Purlin Depth | Cleat Height (approx.) | Standard Bolt (bolt-on) | Weld-on Plate Bolts |
| 140mm | 140mm | M16 Grade 8.8 | M12 Grade 8.8 |
| 170mm | 175mm | M16 Grade 8.8 | M12 Grade 8.8 |
| 200mm | 200mm | M16 Grade 8.8 | M12 Grade 8.8 |
| Up to 450mm | Custom / fabricated | As specified | As specified |
Note: These are typical standard sizes. Always verify against the purlin manufacturer’s specification sheet for your specific project, as dimensions can vary between suppliers. Cleats longer than 450mm are non-standard and must be fabricated to order.
How to Install Roof Purlin Cleats
The installation process depends on whether you are using bolt-on or weld-on cleats. Here is a general overview of both methods:
Installing Bolt-On Purlin Cleats
- Position the cleat on the rafter flange at the correct spacing as per the structural drawings.
- Align the pre-drilled holes in the cleat baseplate with the holes in the rafter.
- Insert M16 Grade 8.8 bolts through the baseplate and rafter flange. For a steel connection, use an 18mm clearance hole; for timber, use a 14mm hole.
- Tighten bolts to the torque specified in the design drawings or manufacturer’s guidance
- Drop the C or Z purlin into position against the cleat and secure with M12 Grade 8.8 bolts through the pre-drilled holes.
- Check that the purlin is sitting square and plumb before fully tightening.
Installing Weld-On Purlin Cleats
- Weld-on cleats must be fitted in the fabrication workshop before the structure is erected — they cannot be welded in position at height.
- Mark the correct cleat positions on the rafter in accordance with the structural drawings.
- Tack the cleat into position and check it is square before full welding.
- Complete the weld to the specified throat thickness and weld category.
- Once the structure is erected, the purlins are bolted to the pre-welded cleats on site.
Tip: For extensions or additions to existing buildings, bolt-on cleats are much preferred as they eliminate the need for any on-site welding at height.
Frequently Asked Questions (FAQ) About Roof Purlin Cleats
Yes, but you will need to use a 14mm clearance hole in the cleat for a timber connection (as opposed to 18mm for steel). Some bolt-on cleats also require a wooden support plate when used as an offset cleat on timber.
Yes. Standard purlin cleats are compatible with both C-section (Cee) and Z-section (Zed) purlins. The pre-drilled hole patterns are designed to align with standard purlin bolt hole positions for both section types.
This depends on how your purlins are joined. Single cleats are used where purlins overlap (lap joints), while double cleats are used at butt joints or where the structural engineer specifies additional restraint. For most light industrial and residential steel roofs, single cleats are sufficient.
For the four-bolt connection attaching the cleat baseplate to the rafter, M16 Grade 8.8 bolts are standard. For connecting the purlin itself to the cleat, M12 Grade 8.8 bolts are typically used. Always verify with your structural engineer’s drawings.
Bolt-on cleats are attached to the rafter using bolts and require no welding — ideal for site work or adding to existing structures. Weld-on cleats are welded to the rafter in the workshop before the frame is erected, creating a very strong connection but requiring fabrication work before erection.
The longest standard cleat available off-the-shelf is approximately 450mm. If your project requires a longer cleat, it will need to be custom fabricated by your steel fabricator. This is not uncommon for deeper purlins or special structural situations.
Stiffened cleats are required for roof slopes exceeding 30° and are always recommended for tiled roof construction. The stiffener plate prevents the cleat from bending under the increased lateral forces generated by steeper pitches or heavier roof coverings.
Conclusion
The roof purlin cleat is perfect for joining or connecting Cee or Zed sections. Most of the time, they connect wall girts to columns, roof battens or roof purlins to rafters, and other similar things.


